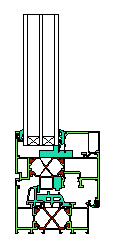
Either use your version of the construction from tutorial 3 or load the saved version WI77_EN.flx from the tutorial subcategory in the flixo program directory.

Figure 1
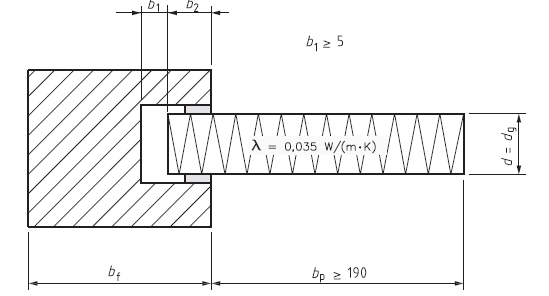
For the calculation of the frame U-value according to the European standard EN ISO 10077-2, the glass unit has to be replaced by a panel (cf. figure 2) with the following characteristics:
| • | The thickness of the panel should correspond to the thickness of the glass unit. |
| • | The thickness of the air cavity between the panel and the frame (cf. b1) should at least be 5mm thick. |
| • | The visible part of the panel (cf. bp) should at least be 190 mm. |
| • | According to EN ISO 10077-1, the measurements b2 and bp should correspond to the larger of the two projected widths of the frame section, without taking into account the stripping between the frame and glass unit or panel (cf. figure 2). |
| • | The thermal conductivity of the panel should be 0.035 W/(mK). |

Figure 2
We will create the panel and an air cavity in the next steps. Click on the arrows in the graphic below to navigate in tutorial 4.
Summary
| • | A rectangular domain is created with the Rectangular Domain tool  . The corner points are captured with active snap functions (Grid . The corner points are captured with active snap functions (Grid  , Guidelines , Guidelines  and Objects and Objects , see menu Arrange). , see menu Arrange). |
| • | The can be adjusted by clicking on the  icon in the upper left hand corner of the rulers and moving the mouse in the direction of the new origin and releasing at the desired spot. icon in the upper left hand corner of the rulers and moving the mouse in the direction of the new origin and releasing at the desired spot. |
| • | When adjusting the of an object with the keyboard (cf. Select, Move, Scale tool  ), the and coordinates represent the position of the reference point ), the and coordinates represent the position of the reference point  . . |
| • | When adjusting the of an object with the keyboard (cf. Select, Move, Scale tool  ), the reference point ), the reference point  determines the point of the circumscribing rectangle, which is not moved during the adjustment. determines the point of the circumscribing rectangle, which is not moved during the adjustment. |
| • | The of the objects and their visibility is taken into account during the calculation. You can adjust the order of the selected domain with the Arrange menu commands or by clicking on the corresponding icon ( , ,  , ,  respectively respectively  ) in the arrange toolbar. ) in the arrange toolbar. |
| • | Selected elements can be rotated 90° ( respectively respectively  )or mirrored ( )or mirrored ( respectively respectively  ) by either clinking on the according icons in the arrange toolbar or by selecting the corresponding commands in the Arrange menu. ) by either clinking on the according icons in the arrange toolbar or by selecting the corresponding commands in the Arrange menu. |
 To continue the tutorial you can click here or use the navigation buttons on the top.


